September 2013

I don’t usually post truly “In Progress” projects, usually waiting until I’m fairly along and functioning before spilling it all out to the world but thought I’d throw this one out there as it will likely be a long continuously improving (hopefully improving at least) project. Additionally with the lawn mowing / trimming season winding down here, it may be a few months before I can really test it out in the field so I thought I’d share now.
But Why?
The TrimmerBot came about as a middle project between my radio control mower ProtoMow One that was pure RC and a planned radio control implementation of my big 54” zero turn mower. Some may know already but this is generally driven by some issues I have with my back that makes it quite uncomfortable to push/pull or ride bumpy things such as mowers, and unfortunately things like motorcycles and mountain bikes as well…
Yeah, that’s the ticket, sure it is, It’s not like I’m LAZY or anything. Umm… yeah, sure. :-/
Anyhow, in order to drive the big 54” zero turn, I was going to have to develop code for an “Arduino in the Middle” solution to translate the radio control signals from the transmitter and drive the needed linear actuators to move the zero turn arms. It wasn’t going to work like the smaller RC mower with the servos driving controls directly without big, and expensive, servos. The big mower also needs more safety features like sonar sensors or similar to shut down if things get too close or out of control. Having an Arduino in the middle reading inputs, driving outputs, and reading sensors along with a failsafe separate RC servo kill switch seems to be the way to handle it to me.
The Plan
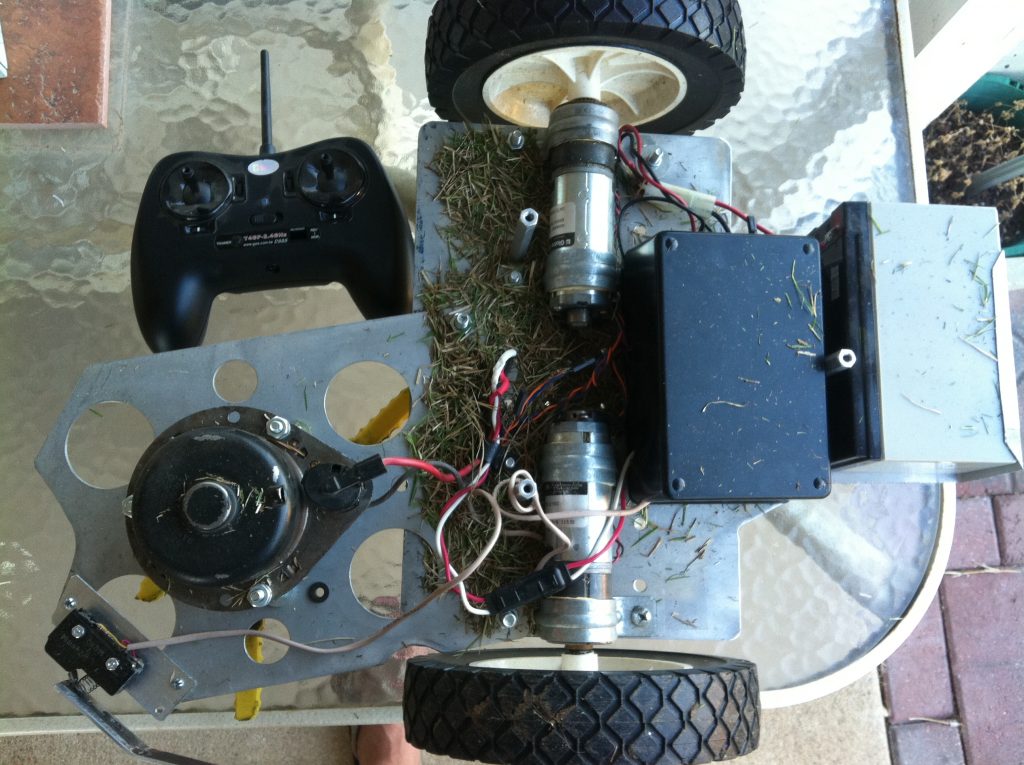
With that in mind, I started playing with sample code to read the RC signals and drive motors based on that input. Thinking that was going to be quite complicated and require lots of time, I was pleasantly surprised at how easy it is to read RC channels and act on them with an Arduino. After having that basic code working in a short period of time, I could control motors based on radio channel values. In the mean time ossipee gave me a link to a low cost four channel dual stick radio system that had centered sticks, just what I needed for the big mower build, so I had good four channel radio now to work from. The plan was really to jump straight to the big mower and make it work but then I realized I needed to get some shorter throw linear motors for that project so I ordered new ones and waited.
During this “wait time” kiwiclive posted his Lawna mower bot which I thought was a cool overall project. Looking at what he was doing made me start to think about something similar and when I start thinking things can go downhill real fast. REAL fast…
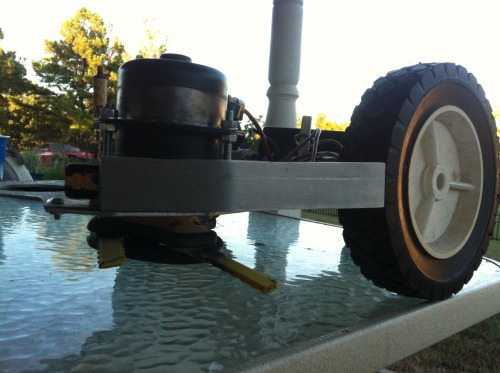
I remembered I had an old electric cooling fan I was going to use on my ‘69 Mustang project which had a nice 12v motor on it as well as an aluminum mount I had built. The motor and mount wasn’t going to work out on the car after all because it was too deep so I was looking for a different cooling solution anyhow. I pulled the fan blade off and was surprised to find a nice left threaded shaft just like some weed eaters have. I dropped by the local hardware store, picked up a $15 trimmer head that had the swing back plastic blades on it and it mounted up perfectly to the motor with one of the mounting options.
The Platform
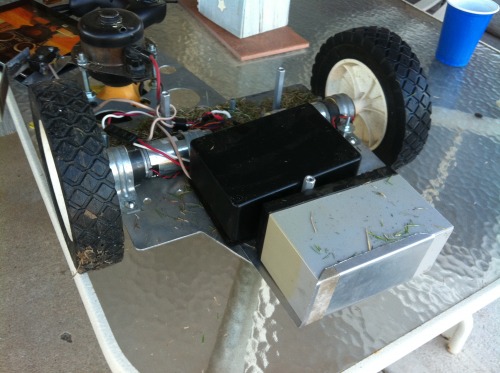
Needing a platform, and not wanting to build yet another, I decided to disassemble my LTBot platform and put it back into service as the trimmer. The LTBot was fun, allowing remote access telepresence with video that I could drive around the house but honestly I just never used that feature. The platform has been around for years and the motors are nice and strong sealed planetary gear heads which have worked out quite well. In fact, they have encoders built into them so some dead reckoning in the future may be possible. Or worse case allow it to drive as straight as possible to trim down a sidewalk, driveway, etc.
I mounted the trimmer head using part of the original aluminum mounting bracket I had made for the car, putting the cutter head in the left front position so it could be a trimmer if desired but still could be used for “mowing” small areas as well.
For power I used an existing 7200mah 12v lead acid battery I had around, mounting it on the back caster to offset the front heavy electric motor and trimmer head. It balanced out quite nicely allowing nothing up front to get in the way of the blades or to run into things or get caught up in things.
Remote Control Works
Initially I just used the remote control feature which allowed me to not only sit in the shade to mow the smaller area of our yard, the “patio yard” is what I call it, with the RC mower but also edge it with the RC Trimmer. Pretty handy overall but knowing the platform had a brain with the ProMini clone in there and lots of programming space still available I wanted more capability. Using the RC function helped me to get a better idea of how the platform handled, moved, etc and how long it would run on a single charge on the 12v lead acid battery. Under RC it will easily run around 30 minutes or more on a single charge.
So Now What?
Thinking about it, for the most part, trimming a lawn or edging is just “wall following” right? You move along the fence, bricks, house, edging, etc and cut the area you couldn’t get to the with the mower. Sure, there are some areas where there are no boundaries to move against such as exposed flowers, sidewalks, etc but a lot of edging is against a wall or something similar. So why not use the standard wall follower function to edge a lawn? That is the idea anyhow, implementation isn’t as easy as it always seems. I had thought about using IR or ultrasonic sensors but with the variable materials and fences such as chain link being likely invisible to such technologies I figured that “touch” was the best solution. Long term the bot needs to have a much more comprehensive bumper / touch system but for proof of concept I used an old monster lever switch my Dad had salvaged off of something years ago.
I have to stop and just saw how cool it is finding some of the things that my Dad used to stick back and salvage off things, just like I do today. He never built robots but he did build many electronic items, helped me build computers, including my first, a ZX81 that I still have, and was an “Engineer” for Seagate for many years designing hard drive electronics even though he was only a high school grad. He was a great, smart and kind man and I owe many gratitudes to him for the time he spent with me helping me learn. Miss you Dad!
For testing, I used the big lever switch, added a sweeper arm to rub against the fence and updated the code to basically just bang bang on/off the wall to follow it. I have found that I needed to have different approaches to this in order to stay on the wall and get around outside corners. I built a small test bot for wall following testing and found that it’s best to be aggressive getting back into the wall but gentle driving away in order to hug enough and get around corners but not oscillate on/off the wall too much. It seems to work but could use more tuning as you can see in the original video.
Getting It Done
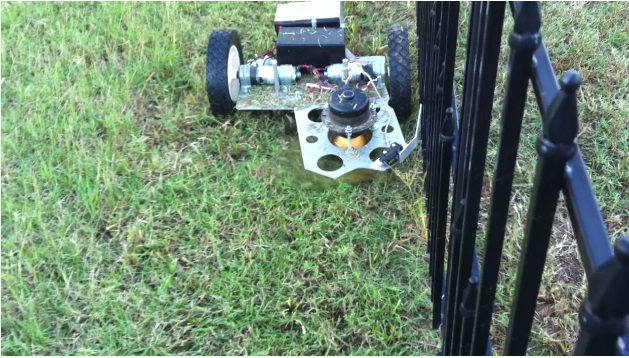
As you can see in most of the pictures here, the bot gets loads of grass all over it. I had thought about cleaning it all up before taking pictures but figured TrimmerBot is a “working bot” and the record should show that he does indeed get work done and gets dirty doing it. So there!
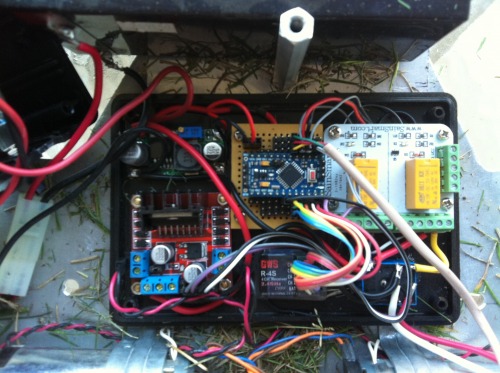
The basic configuration is my favorite CPU, a ProMini ATMega328P clone CPU on a simple home built board that drives an ebay special 298 H-bridge and a SainSmart two channel relay board. I do have the small 2 amp relay driving a larger 10 amp relay as the trimmer motor does pull around 6 amps on startup and 2 amps or so when running. The RC receiver, small power regulator, CPU, and relay boards are all mounted in a small radio shack box that will be permanently mounted to the chassis upside down to keep water and debris out for the most part. The top cover of the box has the power switch in it and snaps over the base.
The code reads the left/right stick forward/backward movements and remaps them to -255 to 255 values to drive the PWM for the h-bridge. If you hold the right stick far right for two seconds it toggles the trimmer motor on/off. If you hold the left stick full left for two seconds it turns the wall follow mode on/off. Holding the right stick far left toggles the second relay which was hooked up to the power the motors but they have since been hooked up directly so that relay output could be used for something else. The left stick full right could be used to toggle on/off another mode such as full auto, straight line drive if I hook up the encoders, or something else in the future.
Future Options?
The platform does need some physical stiffening so another layer or deck will be added to resolve that issue. The second deck will also help to keep the front trimmer motor from drooping from the weight up front as well. I’m not sure if I’m going to use aluminum or clear acrylic or lexan yet for the second layer, will depend on what I have on hand or can find I guess. It also needs a handle to pick it up as it is little heavy with the motor and battery and rather awkward to move around otherwise.
For now, though, the bot actually does what I want – it lets me trim under remote control and follow a fence or boundary trimming under autonomous mode. BUT it does need better bumpers so that will be the next step in the development. I also need to add a front bumper so it can handle inside corners along with the code for that. I’ll develop that code on my little test bot (yes, little bots have their uses!) so I can run it inside on the countertop and then update the code on the big bot when it works.
I really feel like the bot needs a big round front / side bumper to insure it can sense anything it is bumping into and try to avoid it but have no clue how to implement it at this time. First thoughts was cutting up a plastic tub I had bought for the purpose but getting the sensing / switching features right seems like quite a challenge. You can’t just have one arm or ring to sense as outside there are all types of different things at different heights that have to be considered and handled.
Of course long term options could include autonomous mowing, using one of the real time clock modules I have for scheduled “maintenance” mowing like my Roombas do in the house, some means to drive up to a charger and battery voltage monitoring along with the ability to find and drive up to it’s own charging station. Big ideas that can time big time to accomplish, but could be done if I stay motivated…. so, yeah, it will be just an RC / Semi-autonomous little helper for some time to come.
What’s in a Name?
As a closing I know the name is very generic, another word with “bot” added to it but I have not other deep ideas on what to call it and likely the name will stick. He doesn’t quite look like THIS TrimmerBot (http://e3d99.deviantart.com/art/TrimmerBot-1s-397667190) but I’m sure he wishes he did. 🙂
