2016 – Mr. Wallace Comes out of the Closet
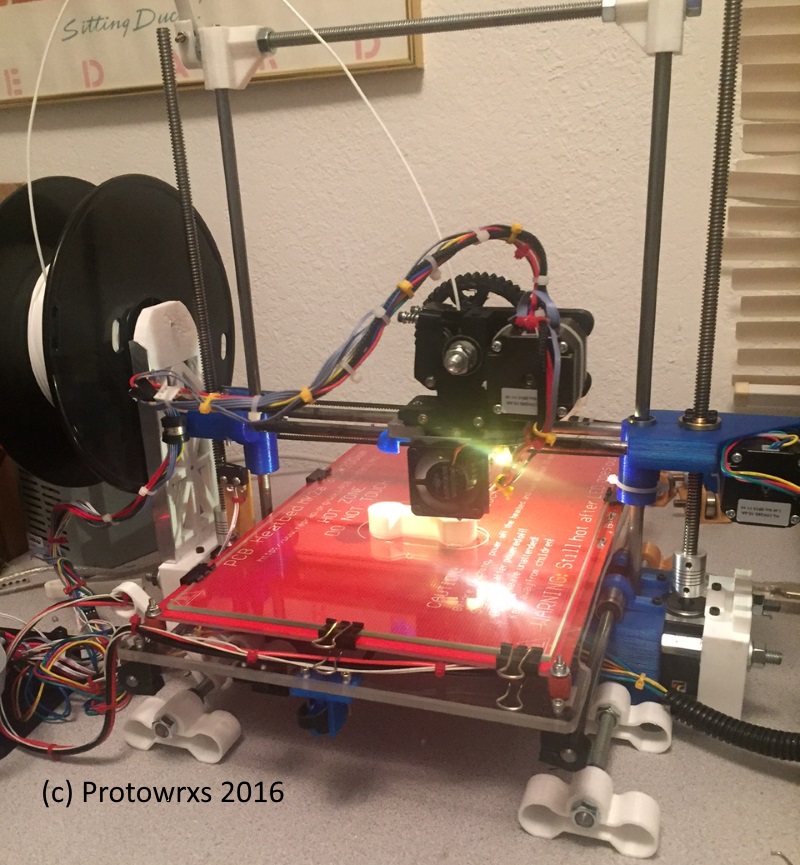
After building my Prusa I2 printer in late 2013 I had a real interest in 3D printers and had an urge to build another one. I also had a lot of spare parts around such as rods, linear bearings, nuts, etc as I over bought for the Prusa build.
I was looking for some more height and at least on one X or Y axis and searching around I found the Wallace++ 8mm design at and thought it was simple and expandable. It looked like the Y axis would be easy enough to extend with just longer rods and the Z could be made higher with the additional stabilizers found around online. I even bought some ebay special steppers, RAMPS and Arduino Mega to drive the thing and printed the parts and some mods I found and put it together in mid 2014.
And then I lost interest… I ended up sticking it in the closet where it sat for more a couple years apparently. The Wallace design is obviously very similar to the original Printrbot design and vice versus. I haven’t looked up which came first but parts can be interchanged in many areas.
In late 2016 after seeing other RobotRebels.org builders such as Jinx and Ossipee starting some new 3D printer builds and having taken a couple weeks off work to reset my brain, I was interested in building something and the Wallace in the closet came to mind so Mr. Wallace came out of the closet… literally.
Originally I couldn’t get the electronics to work and gave it up after losing interest. After a bit of messing around it was obvious the RAMPS board had issues so I ordered a new one since they were so cheap and sure enough the new one worked fine.
The majority of the parts and the inspiration came from the Wallace ++ M8 remix of the original Wallace by sponnet. I did use 5/16″ rod as I’m an “American” and we can’t go down to the local store and pickup 8mm stuff. I was not a fan of the bases used in that remix however and used the bases from another source which I can’t remember or find now.
I wanted a bigger build bed so I extended the Y axis so a 200×300 heated bed would fit but it still needs to be a little longer to get the full 300mm motion. I should have extended the X axis as well so the full 200mm could be used there but all that is needed for that is longer smooth and threaded rod and it can be resolved. Yes, I know, this design is prone to be wobble up top but I extended the Z axis anyhow as I wanted taller print capability.
X Carriage Issues
One of the main issues that needed changing was the X carriage design. I liked the thin setup BUT as designed the carriage would not fit an E3D clone as the hotend is too close to the carriage. After a bit of searching I found Techno35’s generic X carriage for this flat X carriage design and decided to roll my own extruder mount for my favorite geared extruder by Wired1. I do not use the gears from that extruder as I like these thin herring bone versions instead.
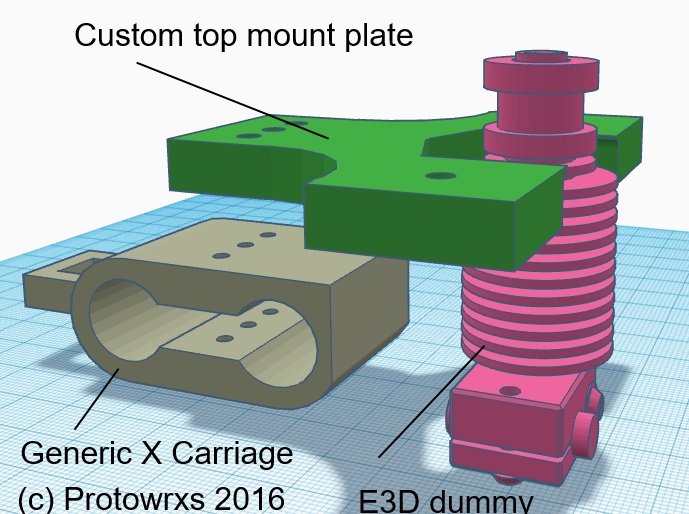
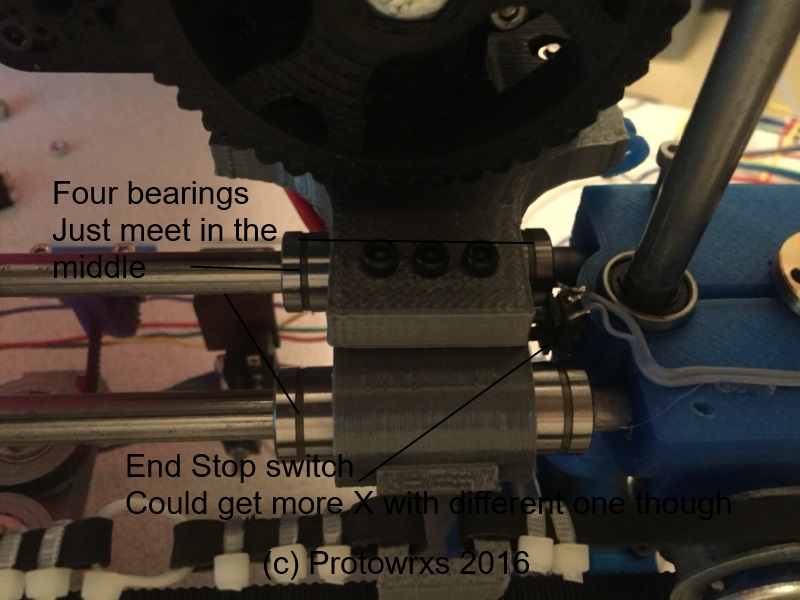
I ended up with the design shown and as ugly as it is it works quite well. The X carriage DOES require at least three linear bearings to keep it tight but I went ahead and installed four to keep it balanced out to my eyeballs.
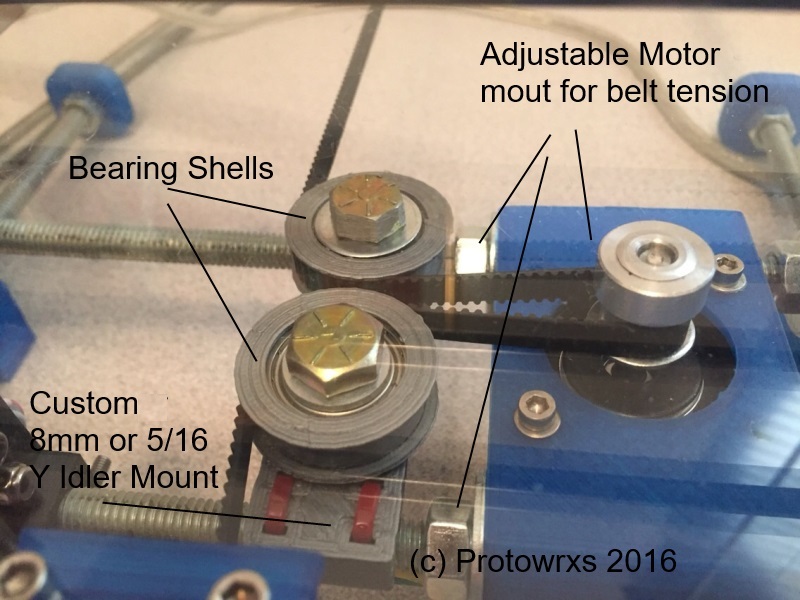
Another thing I didn’t like was the puny Y idler setup that used printed bearing supports and M3 screws. I simply upgraded that to use 5/16″ bolts and 608 bearings and it’s much stronger. I liked Komb’s Y motor mount better and by using it one can adjust Y belt tension by adjusting the bolts on the threaded rods instead of trying to do other end of bed adjusters. I have found out one should really pay attention to belt alignment on the pulleys as it will pull the 608 shells apart otherwise and make a nice little print failure.
Go Big or Go Home
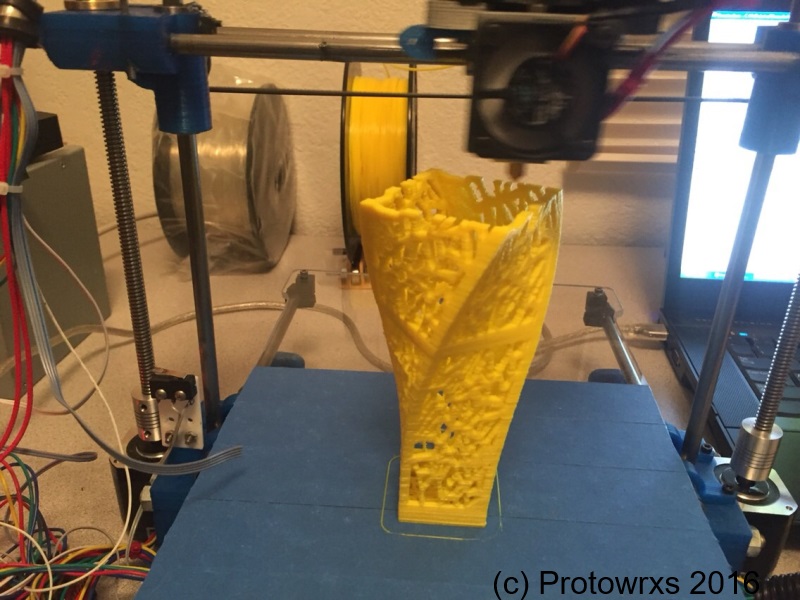
I figured I wanted to go tall so on literally the third print I figured “Go Big or Go Home” and since I was already home I went big. The print turned out rather well especially since I didn’t use the “vase” option or anything in Slic3r. Since there wasn’t a lot of infill the top layers didn’t wobble much and the print was quite usable
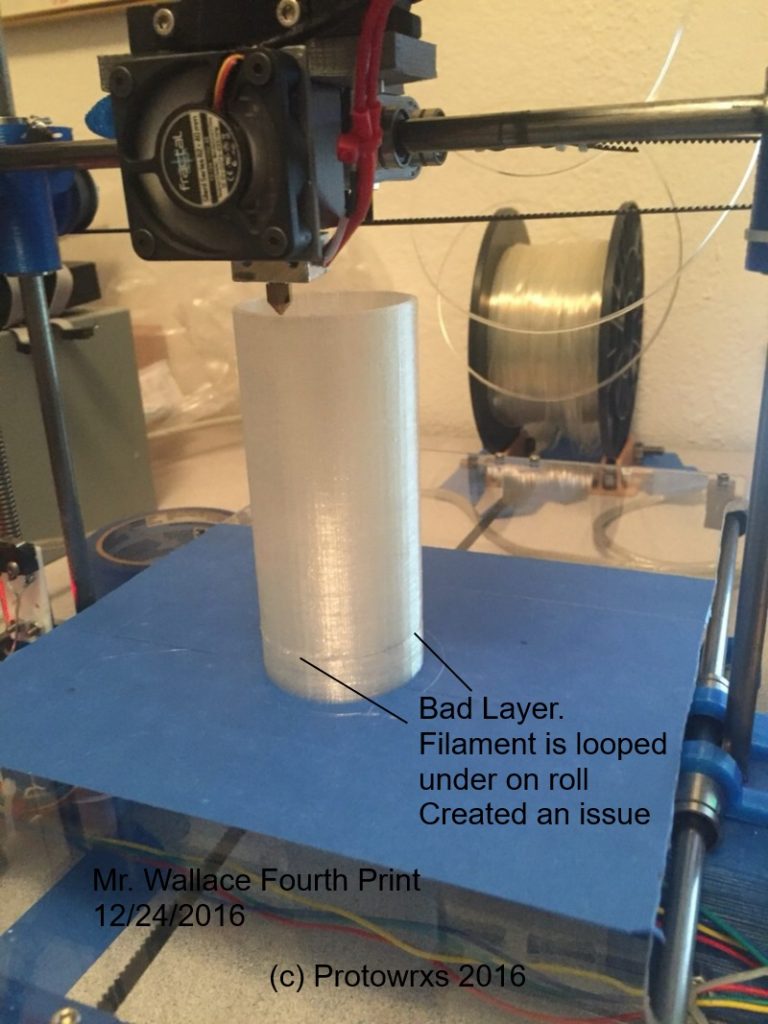
Next I tried a tall print by printing the bulb for my Steam Punk ESP controller light project and it printed nicely. Early on I had a filament underloop on the spool which created a dead layer or two but I just shortened the final output and kept the print as it came out. The circle print was cleaner since there was much less rapid jerk movement up high.
Overall Impressions
Overall I’m happy with this little printer and glad he came out of the closet and is making stuff. In fact, Mr. Wallace is already reproducing (you really didn’t think THAT way of him coming out of the closet did you?) by making parts for another Wallace my son and I are going to build so he’ll have something to print things for his Mechanical Engineering Tech degree he is finishing up over the next year or so.
The printer is definitely not going to compete with the big box CoreXY devices being built today or break any print speed or quality records but for an old man coming out of the Closet it’s not doing too bad of a job.
Plans for Improvements
I do think that the extruder needs to be swapped out for a bowden setup to lower the wobbles and to obtain better top layer prints and that is already in the works. I’ve never worked with a bowden setup but found this mixed extruder by yimamura which was originally designed by schlottz which is a very popular direct drive design.

I mixed it up from there to lay it flat on top of an update top Z rod mount keeping it close to the filament stand but allowing enough flex in the bowden feed for full X and Z motion… I hope anyhow.
If I have issues with the direct drive setup or can’t figure out the calibration I’ll fall back and use the existing extruder with a bowden output adapter I designed that is basically just a J Head with a hole for the bowden fitting. I can then redesign a top mount for it to use.
Closing Points
In closing would I recommend building this printer? Sure if you want something simple, cheap and effective. It’s not going to perform like the CoreXY printers but it’s really cheap with the only cost being the RAMPS, Hotend, lead screws, connectors, rods, and bearings which are all dang cheap anymore.
The basic run down for cost is like this:
- RAMPS – $25
- Steppers – $50
- Heated – $40
- Couplers – $ 8
- Lead Screws – $12
- Bearings – $ 5
- Hot end – $13
- Rods – $10
- Misc. – $10
- Filament – $ 5
- Total – $178 maybe??
Not bad for a simple device. I know power supply isn’t up there but I’ve always used a junk PC power supply so with a PS maybe $200 total.
Is that better that the $200 knock offs? No clue as I don’t own one but I do know my hands built this one 🙂
Updates and Changes
01/07/2017 – Added some Backbone
After watching the printer work for a while I could indeed see some wobble during taller printers. This is more of a problem using the X carriage mounted extruder which has more mass to move around and change directions on. I was planning on moving to a bowden extruder to get the mass off the X carriage anyhow but then I thought the easiest possible resolution would be simple Z rod supports.
Mr. Wallace has the cross bar support that keeps things separated properly and does provide some stiffening but I figured I could design some simple connections that would allow running from the top cross bar down to the rear legs. By simply adding a cross bolt connection to the feet I’ve been using and then making a simple rod end I would easily make a flexible stiffening rod that wouldn’t be limited to any particular rod lengths.
01/08/2017 – Y Axis Issues
From the beginning of the build there have been a few issues with the Y axis that I have now tracked down to the loose fit of the Y motor mount. It is not snug on the cross bars hole wise so it wants to tip towards the idler pulleys. This then drives the belt up to the top edge of the pulley and puts pressure and noise into the movement. First indications were when it pushed the top off of the 608 idler bearing but I didn’t catch the Y motor issue then. To try to eliminate the 608 bearing sleeve issue, I used some 5mm mount pulleys but they are not smooth and they introduced some noise themselves that can be seen in the Y output. Next step is to try some 5mm smooth pulleys that are on order now.
01/11/2017 – Mr Wallace Goes Skipping
Just a little update on the Wallace printer – He decides to start skipping about.
The old man can still skip around… and that’s not good. After printing countless prints without major issues suddenly Mr. Wallace started skipping around on the Y Axis. I have changed things around on the Y drive going from 608 bearing idlers to toothed 12mm / 5mm hole mounted ones as a temp fix. He printed fine with the toothed idlers for days and then starting skipping on the Y sometimes.
After making sure the belt was tight, the wiring was good and nothing was binding I replaced the stepper and the stepper driver and re-adjusted all the voltage settings and he still skipped even though holding the Y direction by hand and moving the bed actually moves the whole printer so the power is there. I added a different belt tensioner thinking maybe the friction ones are flexing or messing up and still skipped. I even put a camera on him that is on my NVR and watched the video and of course right when he skipped there were several missing frames and the frame rate isn’t that good anyhow so I learned nothing.
Next I replaced the existing belt as it had been rubbing on the pulley edge with the 608 bearing setup and the pulley configuration at that time. Thought is maybe the belt had some damage even though it looked fine to the eye and touch. Instead of doing this properly and making one change at a time I also made some firmware changes on the Y Jerk settings lowering the value and dropped max acceleration on Y down by half to see if the big bed / mount is too much to stop and reverse as it seems it occurred during the short back and forth movements for infill on long thin parts.
Or so I thought. On the final once over after putting everything back together I happened to notice that a cut off zip tie head from the head bed wiring was catching on the front foot sometimes. I really didn’t think it could be the issue but when I manually made it snag it was pretty difficult to pull loose. This makes more sense that it only occurred on prints with more Y movement but other times would print all the way without any issues.
Lesson learned? Nothing really, I’m sure I’ll do something stupid like that again but so far Mr. Wallace has stopped skipping on the Y side and is printing away again. But in reality one should triple check the basics first, second, third and more before trying something different. Oh well, if he starts skipping again I’ll know it was none of the above… and have a bigger challenge to figure out.
