August 2013
First off this is definitely NOT a robot based on my criteria but it was a fun project and may well lead to more autonomous builds and features in the future so here it is.
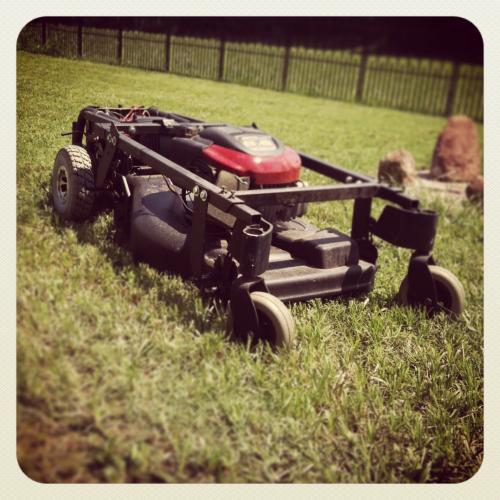
Looking for an easy way to reduce some back pain issues and having always wanted to sit on the patio and mow the lawn, those two desires met to complete this basic small RC lawn mower. There are many other similar solutions out across the net and this one is a very simple deployment… but it works.
The Power Chair…
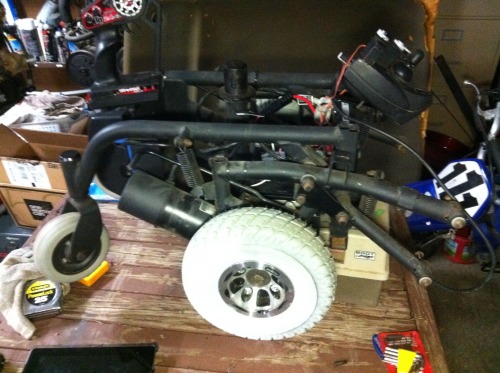
In order to move a RC mower you need some pretty good power and like most of the other RC mowers out there a used power chair was the easiest solution. Lucky for me I located a very nice chair that was dead according to the owner. I figured for $50 I was getting a steal as long as the motors worked so I picked it up and began debugging the system. The previous owner said it used to work but just quit one day after being left on the patio and maybe had gotten wet and never would power up again.
I pulled the joystick controller apart and all looked fine, disconnected the motors from the speed controller and put some 12v power to the motors and they both work so back to the controller. After dropping a couple new batteries in I measured the voltages at the joystick controller and nothing. So I started tracing the wiring between the joystick controller on the arm and speed controller in the base and bingo – the power wire had been caught up in some moving parts and cut in two. In fact the cut wire was in an extension wire that was in place so I just removed the extension and I had a working power chair!
Of course I had to sit on the now nearly bare frame and drive around for a while with the controller. That is when I learned how powerful the speed controller and motors really were allowing me to plow through the yard without ever getting stopped. Might get some wheel spin but never bogging down or overheating.
The Mower…

The mower is a hand me down from my mother when she purchased a newer model years ago. It needed a few little things like rebuilding the carb, cleaning up the starter, etc but overall was a good self propelled electric start mower that I used for a few years after fixing it. What I did like about it was the electric start as I knew I would have two 12v batteries in the Power Chair and could easily add push button start abilities to the RC version. I know I could even add remote start if desired and I installed more than a two channel radio but push button works well.
The other concern initially was I wanted to insure I kept the ability to adjust the cutting height and even could revert the mower back to manual if I couldn’t get everything to work as desired remote control wise. Otherwise I simply cleaned up the deck and painted it with some black bedliner quality paint that matched the chair base, cleaned up and repainted the engine cover, pulled the wheels and went from there.
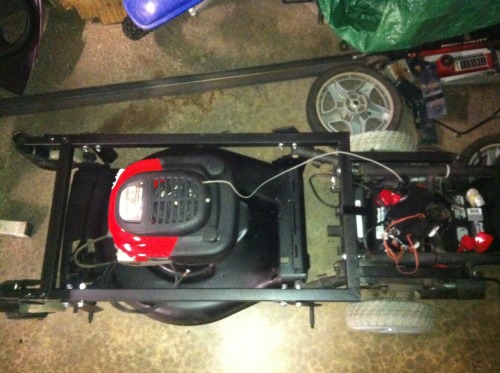
The Frame…
After sketching out a few design ideas and looking over other builds online I started piecing together my plans for the mower. Although it would have been desirable to have a shorter version, that would have required pulling the chair base completely apart, designing and welding a new cage, re-mounting everything and a lot more work. I figured I could live with some extra length if it made things easier so I decided to pull the front casters and push the mower as close to the front of the frame as possible. The front casters where a suspension type design allowed to move up and down and would not work for my mower needs anyhow. From there I began to build a frame to meld the two together.
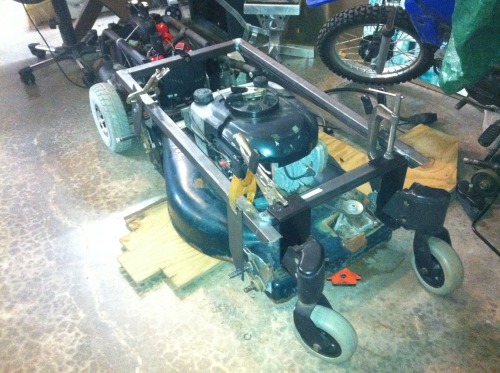
The frame actually worked out much similar that I figured it would be. A simple box frame with a couple extensions on the back to tie in the rest of the chair base. Some 1 ¼ inch square tubing from the local hardware store worked well for such a simple frame and after measuring out the square and chopping up a few pieces the core frame was tack welded together.
In order to keep the adjustability and wanting to avoid having to build my own level adjustments, I just used the existing wheel axles as my mounting points for the mower base. That has been done on other projects I found as well and it looked simple enough. I had seen other mowers using the same tubing for the “drops” that connect the top frame down to the wheel axles but I had a couple ?” plate mild steel sheets sitting around that fit the bill perfectly. I did have to bolt them the frame so they could be removed to get the mower out of the frame but I actually like that better anyhow.
The key on the drops was making sure I gave myself enough room to get to the height adjusters and still hang the mower stable enough for use. I located the axle positions in the plates, drilled the axle holes and then slide the drop plates over the axles allowing me to line up the top wherever I wanted and whatever worked best. In order to clear the rear height adjusters I slanted the top of the rear mounts slightly forward. The front drops are straight down and work well in that position.
For the front casters I figured I may need some adjustability, which in the end I am glad I considered. To allow future adjustable front casters I bought some smaller tubing, setup the 90 degree mount needed for the casters off the chair, and then slipped that tubing inside the extended frame front tubing. I then drilled some bolt holes in the top of the frame and welded some nuts to the top over the holes. I can now slip the front casters into the frame and tighten down the lock bolts allowing me to have some adjustments to extend the casters forward as needed.
I’m glad I allowed the adjustment as it has allowed me to keep the casters as tight to the mower as possible without having worry about getting too close or bending something that I would have to cut off and re-weld. Seems to be working so far and allows future adjustments as needed.
The Radio Control / Speed Control…
Note: This was the old original 2013 version. I have since replaced the chair controller and servos with a direct Sabertooth controller which is better with direct control and response.
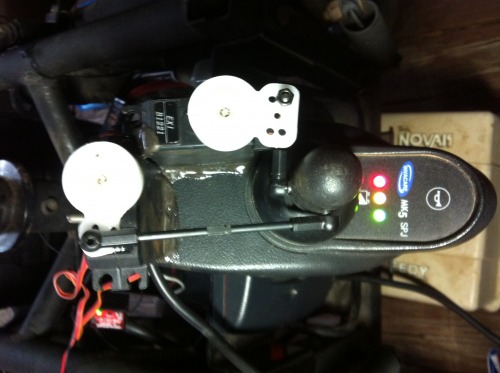
The radio system is a simple 2.4ghz RC car setup driving a couple servos. Instead of trying to hack into the controller, figure out how it works and how to control in internally, I simply added a couple servos to move the joystick just like… ok, kind of like, a human would. One pushes/pulls forwards and backwards, one pushes/pulls left and right. Using a car type controller works well here as it’s a simple throttle goes forward / backward and steering turns left right. One could use a double stick radio but it’s not really needed here. I’m much more comfortable with a car type controller anyhow from having driven and raced RC trucks in the past.
By doing this I avoided spending another $100+ on a motor controller, left the existing controller mounted where it was and can keep the 110v DC charger built into the chair. Very very simple on the control side.
So in the vane of keeping it simple, I JB Welded the two servos to the controller and used some RC truck steering links and ball ends screwed into the joystick to drive it all. This allows the servos to keep the joystick centered when off throttle / steering and move it around in two dimensions as needed.
There are some steering issues. As you can see in the pictures, I used differing lengths of steering rods to drive the joystick… not a good idea. In reality the LONGER the steering rod the better so the forward / backwards one works well but the left/right is really too short. Even after dropping another servo farther away from the joystick there is still some steering error as the stick moves forward and backwards and the short steering rod pushing the joystick slightly sideways. Easily corrected using the steering wheel when driving but not ideal.
The best solution might have been to mount the controller on a plate and then use as long of steering rods as possible to keep the unequal lengths from messing with each other. Doubtful I’ll change it but just a tip if you’re doing the same.
Power Switches / Starter…
The wiring was minimal as well with all that was required is an on/off for the radio, kill switch for the mower engine, and a push button to drive the starter. I left the power toggle on the chair joystick controller, which also has a speed adjustment that can be used to slow things down if desired.
Getting things started does require a few extra switches but it’s really just 1) Turn on radio, 2) turn on receiver, 3) turn on chair controller, 4) Turn off kill switch, 5) prime mower with built in primer bulb, and 6) push the starter button to fire it up. When done I just turn them off in reverse and plug it back into the wall until the next time.
Future Options?
Having built the first one there are always other things you can think of that could have been better but really I am quite happy with the very low cost, very simple design that gets the job done quite easily. If I were to do something different or add more features some may be as below.
Steering Tweaks
As mentioned above, the unequal steering links are the worst part of the design and need to be addressed. It could be addressed either by redesigned linkage or even by software by putting an Arduino in the middle of the servos and let it do some auto-compensating for the linkage differences. Honestly it works fine, just takes a little getting used to compensating for the turn when driving forward so not sure if I’ll actually ever address this.
Trimmer Options
One thing I would really like to figure out is how to add a string trimmer up front on the left to do the edging while mowing next to a fence or patio. Maybe something that could even be turned on/off as needed. The mower was self propelled so there is a take off pulley up front driving the old driveline still that could be used to drive a trimmer setup. Just a thought…
Future Projects?
54” Zero Turn Control Time – ProtoMow Two?
This mower is a small 22” unit and I actually have 3 acres of land to keep up. That would take a very long time with a 22” mower so I have a 54” Zero Turn mower that I ride for the rest of the area away from the house. The remote works great in the patio lawn and close to the house but would take much longer for the larger areas of the lawn.
I’ve actually used the seat off the power chair and mounted it to the zero turn as it is much more comfortable than the original seat… but it’s still not remote control. 🙂 I already have nearly all the parts needed to turn the two stick control mower into a two stick control remote control mower. That includes the two stick radio, receiver, two short through linear activators, hand build mounts, and an Arduino ProMini clone board with a dual H Bridge controller chip ready to go. I just need to make mounts for the other end of the actuators and start borrowing / writing code for the Arduino in between the radio and the controls. I will also be adding some safety features for this one as it’s quite large and dangerous. Current plans call for some bump sensors and ultrasonic sensors that will kill the mower when triggered as well as using the other channels on the radio to fail safe kill it if something goes wrong. This will be a two stick setup as the mower itself is a two stick design so it should be similar to sitting on the thing to drive it. Time will tell… 🙂
ProtoMow Auto?
Also currently being tossed about in my brain and on the bench is a truly autonomous maintenance mower. Something that can run around the edge of an enclosed lawn and randomly mow it Roomba style on a scheduled basis. This steps up the complexity and obviously a brain will be required here as well. The trimmer head is attached to a automotive fan motor and will have variable speed control. The drive motors will likely be some automotive wiper motors and an Arduino will drive the abilities by using bump sensors for wall following and object avoidance.
Even if I get to the level of moving the mower in the middle of the small patio lawn and pressing go and it ends up mowing the whole area I’ll be happy I believe. Should be an interesting project if nothing else.
