Like Spot but a Bot
August 2013
Just a little bot…
Sbot came about from just wanting to make a small little bot with some normal features like sonar and light tracking. Maybe something like a little pet for TED the BiPed or similar. Something that I could put on my desk to play with and that didn’t take up too much room.

Best Plans…
I had originally planned on using one of the ATTiny 85’s I picked up but on the cheap didn’t have much luck with driving the sonar on my first tries so I decided to use one of the Arduino Pro Mini clones that I recently picked up for under $6.37 each. Also originally I was going to use some of those super small GM-15 gear head motors I picked up and used on the Possessed Mouse bot and still may build another small bot to use them. In the end I decided to try using some 9G servos converted to continuous rotation instead. They are real overkill as the little thing has all kinds of torque and can just about climb anything you throw at it.
Keeping it small…
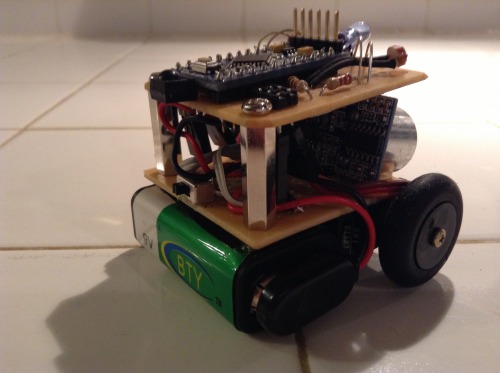
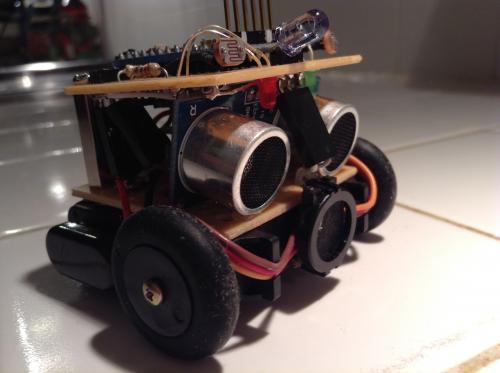
The base platform is really just like TED’s head, a couple small square Radio Shack boards with standoffs holding it apart. Sbot is a little different than TED in that I angled the HC-SR04 sonar down up front as I thought the rear may sag a bit depending what type of rear support I used but it’s just slightly pointing down which is great for something so small and short.
With the servos converted to continuous rotation I still needed a ‘wheel deal’. Remembering I used some actual old wheel mouse wheels on the Possessed Mouse project and I had some left over from that project that just wouldn’t work with the GM-15 motors. They were a different design and required a lot more ‘cutting / drilling / slicing my finger’ work but they mated up pretty good once I got to that point. They are a little wobbly from my lack of precision handy work but they function quite well. They are also super sticky adding to the grip feature I mentioned above. I may have to see just how steep Sbot can climb some time with those servo motors and sticky tires.
I had also picked up some small 240 mah 3.7 LiPo batteries on the cheap as well and figured they would be a good power source for a small bot someday. While looking for a spot to mount them I noticed they fit pretty nicely between the servo ears on the 9gs underneath so a bit of hot glue made that permanent… well as permanent as hot glue can be at least. Not wanting the batteries to BE the rear support I stuck on one of my little furniture sliders and it leveled things out nicely. A scavenged mini single pole, double throw switch from something unknown mounted up nice on the back end and an old mobile phone battery connector was setup to allow charging without having to disconnect anything. Switched ON the battery powers the bot, switched OFF it routes the battery to the charging connector like a few other of my robots.
Well as they say about best laid plans.. Since I stacked the lipo up to get 7.x volts, I could never get them to charge right using the charger methods I have here so back to the power design phase. Having had luck with the rechargeable 9v setups I cut the lipos loose and replaced them with a 9v, charged it up and sBot was back in business. Although the battery does make his butt look big.
With the servos, power, and sonar setup, I moved on to the main board… which was bit of a challenge. I didn’t want a bunch of wires sticking out of the top for the various connections but didn’t want to solder wires between the top and bottom boards either. Looking back, if I were smarter, I would have added a header connector and pins and designed the two to just sit on top of each other like an Arduino Uno shield… but I’m not that smart. Besides, it’s hopefully going to be rare that I pull Sbot apart anyhow. So the final solution was to put some header pins on the BOTTOM side of the CPU board. This wasn’t nearly as easy as I thought it might be. I ended up having to move the plastic on the header pins, install them from the top and then solder / connect it all below. Fortunately there were only four connections that needed to be mated, the two servos and the trigger/echo on the sonar along with the power connection which was done slightly differently.
Making it pretty… or cool.. or something besides messy…
With the top/bottom connection worked out I approached the top board with some aesthetics in mind. I wanted to let the CPU be the main exposed “brain†looking thing and then add the needed components in some balanced fashion. The Pro Mini is soldered to the board so the profile is low enough to look good. For Sbot I needed a very small speaker and wanted to it up front. Luckily the ‘extra parts’ collection from Chris the Carpenter’s WiiCam kit had a tiny speaker that was perfect for Sbot. It’s small and a little quite mounted like it is but gives the little bot some sound features at least and kind of looks like a mouth/nose up front. It is connected to the CPU board through another header pin mounted from the bottom and plugs in up front that kind of looks like a nose.
Wanting some type of LED / Light output up front a couple small LEDs came to mind and were mount pointing down. I used the long leads of the LEDs to loop back around and kind of look like eyebrows up top. The needed resistors were then matched on each side and connected up to the CPU. The LDR sensors then fit nicely under the LED loops and were routed back on the board and their resistors matched up on both sides as well.
I had already soldered on the programming header pin and had originally planned on mounting the CPU with that in the back but sticking it up front kind of gave Sbot the ‘sticky uppy hair’ look so it stayed up front. I may make a connector to plug in up there when not programming that looks more like hair sticking out or around, no telling. Or maybe it can be used as a ‘hat mount’? In any manner it’s a very handy location to hook up. I can use the serial monitor that way as well during tuning or coding without having to hook up another port. I am not using the DTR signal for programming but a quick reset, with the button right on top, makes it easy to get new code into Sbot. So although it looks a little messy up top, it’s not real ‘messy messy’.
Talk to me!
With the original concept of a pet for TED I wanted to add some IR capabilities. I added a receiver at the back of the bot like a little stub tail and an emitter at the front like a, well like a unicorn I guess but couldn’t find a better place to put it. I setup some code to read IR commands and then went to TED to send those commands, and quickly found out the IR library really doesn’t work with a Baby O processor without maybe some major mods. So, TED can tell sBot what to do, but actually sBot could boss TED around. Honestly I guess that is how it is in the real world anyhow right? Our pets are really our boss. 🙂
Future Tricks?
sBot can do a few tricks, none of them very good yet but he’s working on it. Stuff like stay, wag, bark, turn around, look at the light, etc are programmed in but aren’t quite up to performance levels yet. I need to do more training, I mean coding to get things right and polished.
