Echo Dot / Alexa and Home Automation
December 2016
09/2017 Note: This is no longer used as it was designed for my old setup and the current Home Assistant (Hassio) solution has an integration for Alexa that pretty much plug and play. Along with having unsigned SSL cert issues back then, I simply gave up taking this any further.
Getting your Echo to talk to something out there after you have talked to it isn’t that hard to do after all. There are different ways of making this happen using online cloud services BUT using the HTTPS posting feature for your skill can get things done and keep most of your work on your own server instead of off in yet another cloud option. This is how I accomplished integrating my Echo Dot into my old time home automation system and it’s web interface. Granted, I have much more control over my home web interface than others may but doing this with an Echo, Amazon Alexa developer account and good old Classic ASP coding would pretty straight forward.
Below is the basic flow concept of getting things working. You speak, the Dot listens, sends your stuff to the Amazon cloud that compares your request with your “Sample Utterances” and hopefully applies one or your “Intent Schema’s against the utterance. If it figures it out, it sends off a JSON post with the needed information for you to process and return a reply. Sure this is a very round about way of doing this and my old voice control options like BoxHead just talked to my local server directly. But the Echo Dot is much better at recognizing and parsing through voices and you get the benefit of all the other Echo features on top of it.

Amazon Basic Setup
To get things working on the Amazon side you need to get a developers account at http://developer.amazon.com. This is where you will add your new Alexa “Skill” to work with your Echo. You will have to hook your echo to this account so make sure it is linked up with your other Amazon stuff if you want more integration.
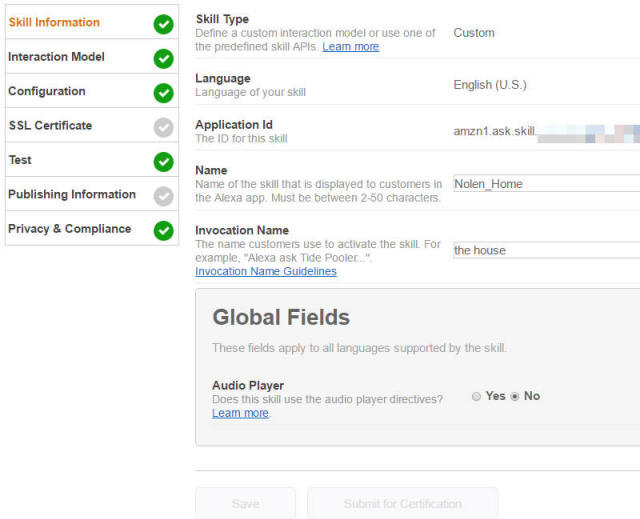
Skill Information
Next you need to add the new Skill. Pick the Add a New Skill button to create your new skill. You’ll need a customer skill and a name for it along with an “Invocation Name”. The main name doesn’t really matter but the “Invocation Name” does as this is how the Echo will know to fire off this skill. Since I will never be publishing this skill for others, I used “the house” as the name. That way I can say “Alexa, ask the house to” and this skill runs. I’m sure “the house” is already used somewhere else but it works for me as I will not be publishing this skill. Be sure and keep your Application Id private as that is what you use to insure it is YOUR skill calling your server and not someone else.
Interaction Model
This is where you will spend most of your time (besides testing at least for me) to setup your “Intents”, “Slots” and “Utterances”.
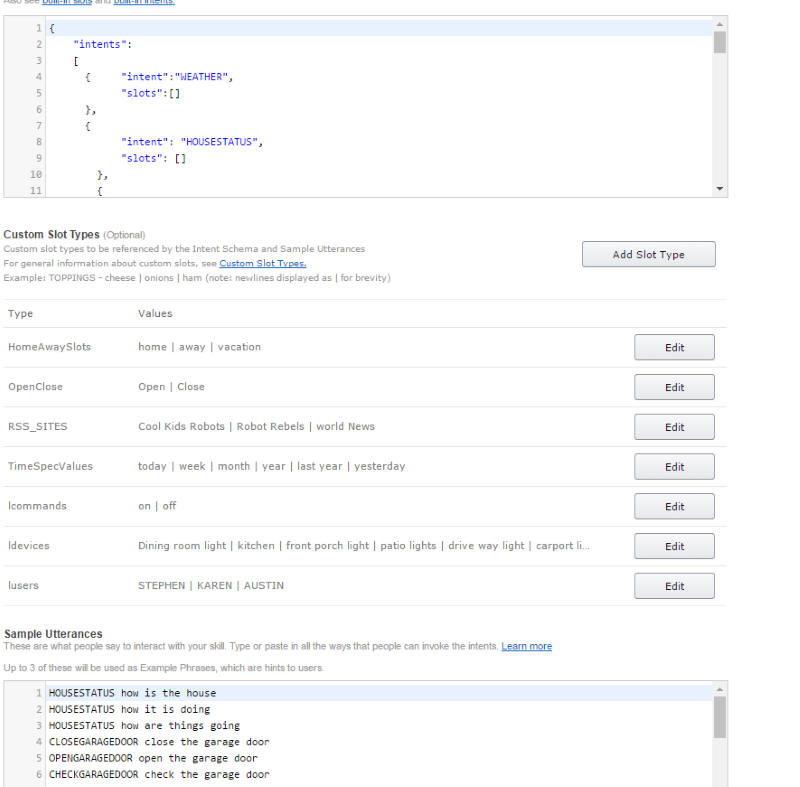
Initially the Intents looked a little weird to me and still kind of do but they are really just in JSON format. You have the overall “intents” section with each “intenet:YOURCOMMAND” inside with “slots” options. If your command is singular without other options like “say goodnight” the the format is easier like this:
      {	"intent": "SAYGOODNIGHT",
       	"slots":[]
      },
If you need to pass some more parameters along like “As the house to turn (on/off) the (which one) light” there is a litte more to it. As an example if you want to be able to say “Alexa, tell the house to turn (on/off) the fireplace” you need to pass that on or off to your end point. There are a lot of built in slot options but I wanted to figure out the custom ones since I needed them so I made a simple on/off custom slot. You do this in the Custom Slot Types area of the page and simply name your slot and add the words or phrases that should be used. Once you’ve added your custom slot you can then add it to the slot informatio in the intent schema. I called my on/off slot “lcommands” for some dumb reason. We that in mind, now have the follows for our fireplace option.
      {	"intent": "FIREPLACE",
       	"slots":[{"name":"lcommand","type":"lcommands"}]
      },
That basically sets up a variable names “lcommand” that will use the “lcommands” slot options to fill in the variable you will see in your utterance setup. Now we need to setup the utterances that will trigger our FIREPLACE command. These are rather simple but can get messy quickly. I’ve kept mine to a minimum but if you think about it there are several different ways to even tell the fireplace to come on or off. Like “Turn on the fireplace”, “Turn the fireplace on”, “Turn fireplace on”, “Turn on fireplace” and I’ sure the creative can come up with other ways like “Turn the #()*$#$ fireplace on” I only setup two options, “Turn the fireplace (on/off)” and “Turn (on/off) the firepleace”. Alexa is actually pretty good at removing the “the”s and other uneeded words to get to the point. So our two basic utterences needed for this are input as follows.
FIREPLACE turn the fireplace {lcommand}
FIREPLACE turn {lcommand} the fireplace
Either of those utterances *should* trigger the intent. Note how the variable was passed through. The { } is used to place the Slot variable in your utterance.
Configuration Tab
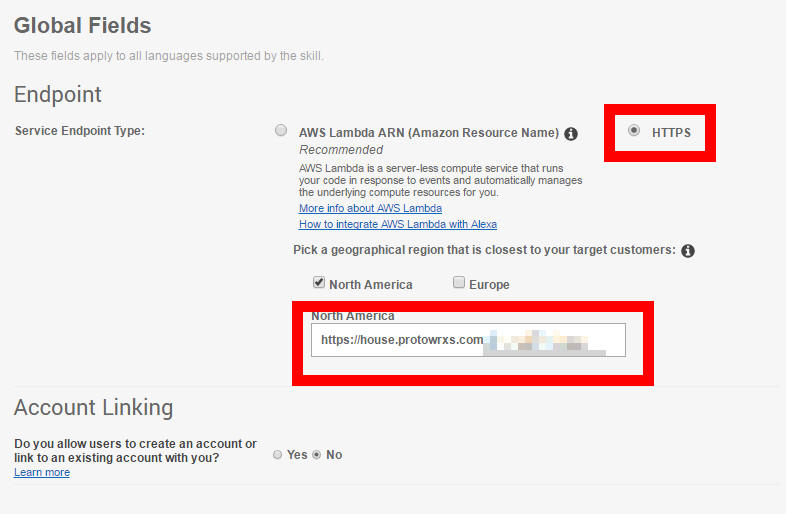
If you’ve gotten this far you’re likely itching to try things out BUT not so fast. We haven’t even setup HOW we are going to trigger this thing yet. Again, you can use the Amazon AWS Lambda ARN adn it’s functions but I had no clue what it was and would rather it just talk to my server directly. selecting the HTTPS option and plugging in your server URL with the https:// prefix gets this done. If you are using a self signed cert, you will have to upload that in the SSL Certificate portion next. If are working off a published cert you just need to check the right box on the SSL page.
SSL Certificate
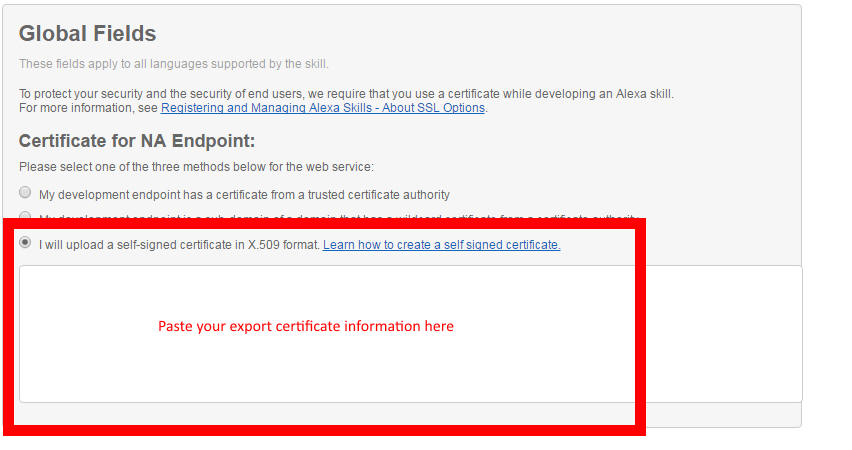
If you are running a server with a published cert you can simply check the appropriate box either as the main trusted version of the wild carded version. Otherwise your self signed certificate needs to exactly match the URL you are using on the other tab. Doing an self signed SSL on a windows machine isn’t too hard and there are many sites showing how to do it. Once you have added your cert to your site you will need to export it in x.509 format and paste the information here. I would advise getting this working early before creating a lot of schema’s and utterance’s to make sure you have it figured out.
Testing Testing

So you have it all figured out, have your “intents” and “slots” and “utterances” and “ssl”s and your “globly-gooks” all done? Ready to test. First make sure the Enabled button in turned on for the “This skill is enabled for testing on your account”.
The testing tab is cool but not cool. It’s cool that you can type in an utterance and see the service request and response, it’s not cool that if your end point fails to respond right you just get a pretty generic error. It will tell you if it’s a 500 error, etc. but no detail beyond that.
I ended up adding code to do a URL get back to my own site and can copy/paste the service request into that file and then toggle a variable to make my responding code read that and output information. That way if there is an error I can print it to the screen or see the full error with line number column for debugging. A bit of a pain but it works.
So now if I type in “turn off the fireplace” OR “turn the fireplace off” we get the service request and hopefully a valid response back.
But Wait! You still need to write your end point code to return the response! We’ll get there but follow along. ASSuming your end point is working you would see something like this in the service request and the response.
You can see we get some special variables about our application ID, your user information, and then the “request” section that we are most interested in. The request “type” tells us what this type is. Generally we get “IntentRequest” which means our voice command matched one of our intents and we should do something about it.
When then see that the actual “intent” was the FIREPLACE and we also see our “lcommand” was off. Now we have what we need to pass along to our code to make something happen. In my local server code I parse out the request.type and the request.type.intent and the request.type.intent.slots.lcommand to get what I need. Since you CAN have different request types that is the first thing I do in my local server code to make sure what to do but we will address that later. In any manner this is what you have to work with depending on if what you said matched any of your utterances. By default I set a reply to “The house couldn’t understand what you want to do” or similar and if no commands match that gets sent back to the cloud to forward to the Echo.
What we get from the Amazon cloud
{
  "session": {
    "sessionId": "SessionId.XYZ",
    "application": {
      "applicationId": "amzn1.ask.skill.ABC"
    },
    "attributes": {},
    "user": {
      "userId": "amzn1.ask.account.123"
    },
    "new": true
  },
  "request": {
    "type": "IntentRequest",
    "requestId": "EdwRequestId.XXX",
    "locale": "en-US",
    "timestamp": "2016-12-02T22:13:53Z",
    "intent": {
      "name": "FIREPLACE",
      "slots": {
        "lcommand": {
          "name": "lcommand",
          "value": "off"
        }
      }
    }
  },
  "version": "1.0"
}
Service Response
So let’s talk about what you need to send back to the Amazon cloud. There is a pretty basic expectation to speak something so I just drop in two variables for what to say and if we should end this session or not. For normal “IntentRequest” I set the shouldEndSession to true so we close the channel and stop listening on the Echo side. There are other ways to response to different intents that can be covered later though.
Since generally you want to send something back to the echo to say, your response should be similar to this even if it’s just “OK”
What we send back to the cloud.
{
  "version": "1.0",
  "response": {
    "outputSpeech": {
      "type": "PlainText",
      "text": " Well, I told the house to turn the fireplace off "
    },
    "shouldEndSession": true
  },
  "sessionAttributes": {}
}
In this case my code has parsed the JSON, found the command to be FIREPLACE and the option to be to turn it off. It then signaled the old JDS Timecommander to send the X10 command and populated the MyResponse variable I used for speech response with the above. There are a couple other things going on there like the “Well,” which is from a random prefix response of things like “Well, OK, Thanks” etc. just to keep it interesting. I also passed the device name and the option back to the echo to say to make it more logical.
Since we set the shouldEndSession variable to true the Echo speaks the text and stops listening so you will have to say “Ask the house” or “Tell the house” again to restart the session. If you just said “Open the house” the Echo sends a LAUNCHREQUEST request type and you should be prepared to leave the session open and do some interaction. What I do with a LAUCHREQUEST is send back “Ok, the house is listening, what do you want to do?” or similar and then you can speak the command without having to say “Ask the house”. This requires sending back the shouldEndSession as false. Currently once a command is received as after a launch request I still close the session to move on but you could work it out to keep the session open and continue prompting.
It’s really just basic JSON back and forth with your end point doing what you want with the commands in the middle.
Home Automation Setup
The SSL Side
On my home automation side I had to do a few things to make it all work. I’m sure there are multiple pages out there on how to setup your own SSL cert on a Windows personal web server. I found a few and used them to set mine up. I did have to add another local net IP as the self signed certificate cannot be a wildcard on the Amazon side I found out the hard way and I have a couple other basic domains on my server. I had to have the certificate set to the house.protowrxs.com domain but my www.protowrxs.com site is there too so I simply added an additional IP and configured things around that. Remember you have to expose port 443 on your router and port it over to your hosting machine as well. Once you an hit your site with https both locally and from the world you should be able to export the certificate as an X.509 and past the BASE64 text into the Amazon skill page.
The Code Side
Remember, I’m stuck in the 1990’s and still use Classic ASP for most of my code. Don’t bitch, whine, and complain about it. It works but can be done in a multitude of other languages as well so just assume the sample process and change the details out as needed. If YOU are coding in Classic ASP then cool, you should be able to copy/paste and give things a try.
Getting the JSON
This was my first challenge as JSON post are not “gettable” by Request.Query or Request.Form commands and I found that out the hard way. Finally I found some information online how to stream the request into a variable and take it from there. Not sure where I found it but it’s pretty straight forward code as follows:
'** Get the body to process the JSON data
If Request.TotalBytes > 0 Then
	Dim lngBytesCount
	lngBytesCount = Request.TotalBytes
	jstring = BytesToStr(Request.BinaryRead(lngBytesCount))
End If
Once you have the JSON information in the jstring or whatever you like to call it we can parse it. But how? It gets messy trying to roll your own unless you know what you’re doing and the ASP based JSON functions I found didn’t work for me at least. Fortunately I rand across the JSON2.js library (https://github.com/douglascrockford/JSON-js) by Douglas Crockford that works great and still interfaces with the web server so I can get JScript variables into my ASP code. I guess that’s how it works but I’m a hack coder so not completely sure of the back side details. I just know it works for me.
To parse the JSON data I used this:
<script language="JScript"; runat="server"; src="/json2.js"></script>
Set myJSON = JSON.parse(jstring)
'** First we check what type of request we have
'** if an intent then we get our intent or command from Alexa
MyRequest = UCase(myJSON.request.type)
Now I have that request type in the MyRequest variable and can move along further. The next thing is to see what type of request we have an act accordingly so I test it to see. If we have a SESSIONENDEDREQUEST then we had that command from the Echo or Amazon cloud so make the response say I am no longer talk to the house so the speaker knows the Echo needs different information and end the session. If we have a valid intent then default our response to expect failure by saying we didn’t understand that command but we are going to do to process the intent. If we get a LAUNCHREQUEST then we say “Open the house” so we leave the session open and ask the user what they want to do. This is at least my hack as to how to deal with these initial. Likely I will need to improve these over time but they seem to work for now. Note that we loaded up the intent.name in the MyCommand variable. This the what the intent was figured out to be from your utterances so we need to try to do this.
	'** if we get an end session then just send back the end info
If MyRequestIf MyRequest = "SESSIONENDEDREQUEST" then
	MyResponse = "I am no longer talking to the house."
	MySessionEnd = "true"
	MyCommand = ""
End If

If MyRequest = "INTENTREQUEST" then
	MyCommand = myJSON.request.intent.name
	MySessionEnd = "true" '** End the session as we have an intent
	MyResponse = "Sorry, the house didn't understand that command " & MyCommand '** default this in case we cannot find a function
End If

'** If we have a launch request which is basically "Alexa open the house" we just send back the question
'** They can then say turn on xx and we will get the intent back
'** We may need to think about if we keep the session open after the intent of just close it
'** leaving it open would allow multiple commands???
If MyRequest = "LAUNCHREQUEST" then
	MySessionEnd = "false"
	MyResponse = "The house is listening, what do you want it to do?"
End If
So now we know we have an intent we need to get the details if required. Our example is the FIREPLACE so we know we should have an “lcommand” to either turn it on or off. We need to get that value and then process it. For my system that means turning on an X10 device that the fireplace is hooked up to through the JDS Timecommand system. Your system will obviously be very different or maybe you are talking to a local ESP8266 device by http to turn something on or off. Lots of options but this is how my code works for this need.
'** Simply turn on / off the fireplace command - THis is on an X10 module
If MyCommand = "FIREPLACE" then
	Myresponse = ""
	MyDeviceCmd = myJson.request.intent.slots.lcommand.value
	MyCommand = "X"
	MyDevice = "FirePlace"
	If UCase(MyDeviceCmd) = "ON" then
		MyValue = 1
	Else
		MyValue = 0
	End If
	Myresponse = "The Fireplace should now be turned " & MyDeviceCmd

End If
'** Then further down in the code...
'** MyDevice is device name, value = 0 or 1
If MyCommand = "X" Then
	Devices.X10Devices.Item(Mydevice).State = MyValue
End If
If you wanted to have your home server hit an ESP8266 on your local network you could easily accomplish that by simply connecting to the ESP URL and executing that command.
	Set objHttp = CreateObject("Msxml2.ServerXMLHTTP")
	objHttp.Open "GET", "http://192.168.123.XXX/gpio/" & LEDcmd, False
	objHttp.Send
	Myresults = objHttp.ResponseText
	MyResponse = "The E S P device said " & MyResults
System Response
So far we have received the request, parsed the JSON, found the type of request, and executed that request. The last thing is we need to respond back to the Echo and tell it what to say. Since for my purposes every response has something to say, I have the default JSON response hard coded and just dump the text to say and the session end variable into the response.
{
	"version": "1.0",
		"response": 	"outputSpeech": {
	"type": "PlainText",
	"text": "<%=MyResponse%>"
},
	"shouldEndSession": "<%=MySessionEnd%>"
	"sessionAttributes": {}
}}
The above “code” becomes the following response that goes back to the Amazon cloud.
{
	"version": "1.0",
		"response": 	"outputSpeech": {
	"type": "PlainText",
	"text": "The Fireplace should now be turned off "
},
	"shouldEndSession": true
	"sessionAttributes": {}
}}
The Echo now says “The Fireplace should now be turned off” and we’re done with that request. Easy enough but anything can be done in between the request and the return. You can have your code add cute little sayings at the beginning and ending of your response, insert variables, etc. Nasty Mouthed For better or worse Alexa does NOT have a dirty mouth. Plugging in words like Shit, BullShit, etc ends up with “bull”. I haven’t tried many other words but it can be kind of funny to use some randomized nasty words when things do not go right. For example, if something fails to work, I may send back “Well shit, that didn’t work. Try that again please.” and you get Well S, that didn’t work, Try that again please.” Humorous sometimes at least. Wrapping Up That’s the basics, you mileage will vary, your systems will be different, your approach may be much better but that is how I have it working for now.
